How to Conduct Seat Stability Tester GT-LB20
Sep,24 2024
How to Conduct Seat Stability Tester GT-LB20
The Seat Stability Tester GT-LB20 is an essential tool for quality control, designed to evaluate the stability of various seating types. This article provides a comprehensive guide on operating the Seat Stability Tester GT-LB20, highlighting key steps and tips to optimize your testing process.
What is the Seat Stability Tester GT-LB20?
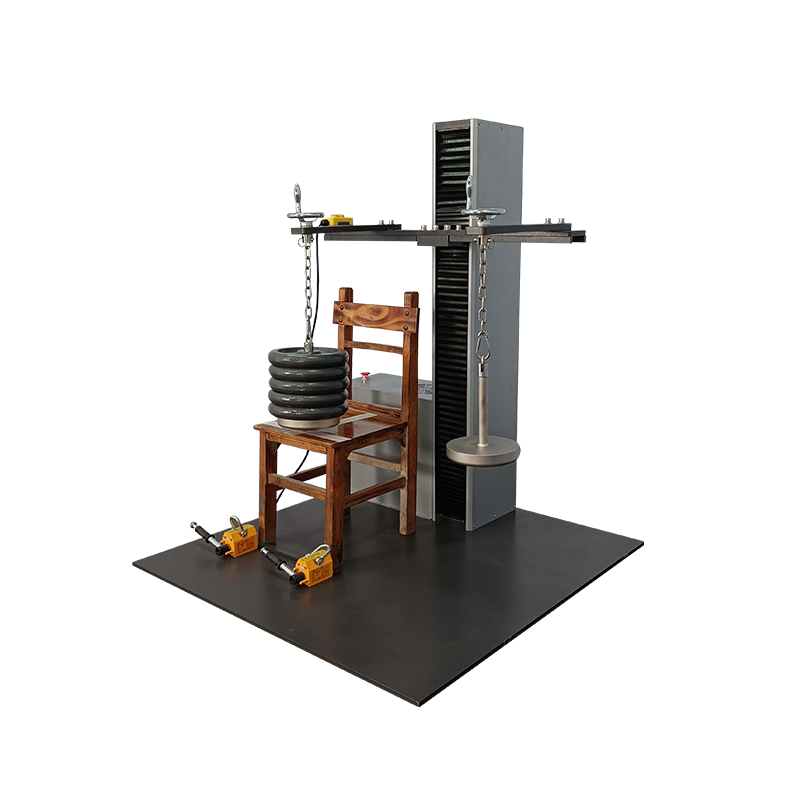
The Seat Stability Tester GT-LB20 is a specialized machine used to assess the stability of seating products under dynamic loads. It simulates real-world conditions by applying specific weights to determine how well a seat can withstand forces that may cause it to tip over or become unstable. This machine is vital for manufacturers aiming to meet safety standards and enhance product reliability.
1. Preparation for Operation
Before you begin testing, it’s crucial to prepare the Seat Stability Tester GT-LB20 for operation. Follow these steps:
1.1 Connect the Power Supply: Ensure the machine is connected to a power source. Check that all connections are secure.
1.2 Turn on the Power Switch: Locate the power switch on the machine and turn it on. This will activate the control panel.
1.3 Emergency Stop Switch: Ensure the emergency stop switch is in the “on” position to allow safe operation. This feature is vital for quickly halting the machine if necessary.
2. Adjust the Weight Beam:
2.1 Use the handle buttons to control the weight beam, adjusting it up or down as needed.
2.2 Loosen the disk screw to move the weight disk back and forth for proper alignment.
3. Setting Up the Weight:
3.1 Lower the weight beam so that the weight disk presses against the base plate. This action will allow you to remove the chain safely.
3.2 Place the specified weight (typically 50KG) onto the weight disk.
3.3 Secure the chain to prevent any unintended movements during the test.
4. Preparing the Test Chair:
4.1 Position the test chair under the weight tray, ensuring that the test point aligns with the center of the weight tray for accurate results.
4.2 Place stopper blocks on the legs of the chair. These blocks should be secured with magnets to prevent shifting during the test.
5. Conducting the Test:
5.1 Move the beam downward until the chain is slack, which indicates readiness for the test.
5.2 Apply a pulling force in the direction parallel to the loading point. This simulates real-world forces acting on the chair.
5.3 Observe the chair’s stability throughout the process. Pay close attention to any signs of tipping or instability.
6. Analyzing Test Results
After completing the test, it’s essential to analyze the results:
6.1 Check for Movement: Determine whether the chair remains stable under the applied weight. Any movement could indicate potential design flaws.
6.2 Document Findings: Record the results for future reference and quality control assessments. Consistent testing and documentation can help identify trends over time.
7. Safety Precautions
Safety is paramount when operating any testing equipment. Here are some important precautions to consider:
7.1 Always ensure the emergency stop switch is easily accessible during testing.
7.2 Wear appropriate personal protective equipment (PPE) to safeguard against any potential hazards.
7.3 Regularly inspect the machine for any signs of wear or damage to maintain optimal performance.
For more information on the Seat Stability Tester GT-LB20 and other testing equipment, feel free to explore our website or contact our customer service team for assistance.


